MongoDB Replication: A Complete Introduction

Replication using replica sets is a robust method to increase the data resilience of your entire MongoDB database.
In this article, I’ll walk you through:
Let’s get started.
(This article is part of our MongoDB Guide. Use the right-hand menu to navigate.)
In simple terms, MongoDB replication is the process of creating a copy of the same data set in more than one MongoDB server. This can be achieved by using a Replica Set. A replica set is a group of MongoDB instances that maintain the same data set and pertain to any mongod process.
Replication enables database administrators to provide:
Maintaining multiple MongoDB servers with the same data provides distributed access to the data while increasing the fault tolerance of the database by providing backups.
Additionally, replication can also be used as a part of load balancing, where read and write operations can be distributed across all the instances depending on the use case.
MongoDB handles replication through a Replica Set, which consists of multiple MongoDB nodes that are grouped together as a unit.
A Replica Set requires a minimum of three MongoDB nodes:
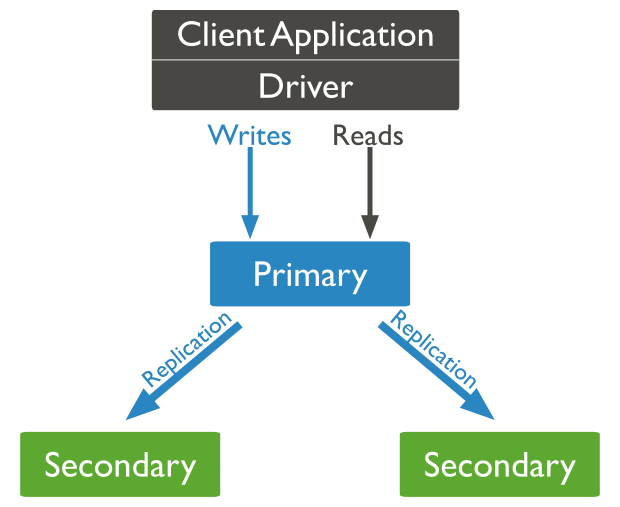
Basic replication methodology
While the primary node is the only instance that accepts write operations, any other node within a replica set can accept read operations. These can be configured through a supported MongoDB client.
In an event where the primary node is unavailable or inoperable, a secondary node will take the primary node’s role to provide continuous availability of data. In such a case, the primary node selection is made through a process called Replica Set Elections, where the most suitable secondary node is selected as the new primary node.
Heartbeat is the process that identifies the current status of a MongoDB node in a replica set. There, the replica set nodes send pings to each other every two seconds (hence the name). If any node doesn't ping back within 10 seconds, the other nodes in the replica set mark it as inaccessible.
This functionality is vital for the automatic failover process where the primary node is unreachable and the secondary nodes do not receive a heartbeat from it within the allocated time frame. Then, MongoDB will automatically assign a secondary server to act as the primary server.
The elections in replica sets are used to determine which MongoDB node should become the primary node. These elections can occur in the following instances:
In the process of an election, first, one of the nodes will raise a flag requesting an election, and all the other nodes will vote to elect that node as the primary node. The average time for an election process to complete is 12 seconds, assuming that replica configuration settings are in their default values. A major factor that may affect the time for an election to complete is the network latency, and it can cause delays in getting your replica set back to operation with the new primary node.
The replica set cannot process any write operations until the election is completed. However, read operations can be served if read queries are configured to be processed on secondary nodes. MongoDB 3.6 supports compatible connectivity drivers to be configured to retry compatible write operations.
A replica set creates multiple copies of the same data set across the replica set nodes. The basic objective of a replica set is to:
Clusters work differently. The MongoDB cluster distributes the data across multiple nodes using a shard key. This process will break down the data into multiple pieces called shards and then copy each shard to a separate node.
The main purpose of a cluster is to support extremely large data sets and high throughput operations by horizontally scaling the workload.
The major difference between a replica set and a cluster is:
MongoDB allows users to combine these two functionalities by creating a sharded cluster, where each shard is replicated to a secondary server in order to provide high data availability and redundancy.
A major concern when it comes to configuring replication is the replication delay (lag). This refers to the delay in the replication process to a secondary node after an update to the primary node in the replica set.
A certain replication lag while replicating large data sets is normal. Still, the following factors can increase the replication delay, negating the benefits of an up-to-date replication:
The above sections have covered all the important theories related to replication. Next, let’s configure a replica set using MongoDB instances installed on three Ubuntu servers.
Each Ubuntu server will have its own MongoDB instance with the standard MongoDB port 27017 accessible through the firewall. MongoDB recommends using logical DNS hostnames instead of IP addresses when configuring replica sets in production environments. That is to avoid disruptions in communication within the replica set due to changes in IP address.
You can update the /etc/hosts file to assign hostnames to each server in a test environment. There, you have to add the below-mentioned hostnames as the hosts indicating each node and reboot each server to load the new configuration.
/etc/hosts
10.10.10.56 mongodb-node-01
10.10.10.57 mongodb-node-02
10.10.10.58 mongodb-node-03
Before starting the MongoDB instance, you need to modify the config file in each server to reflect the IP address and indicate the replica set. Let's make the following modifications in each mongod.conf file.
mongodb-node-01
# network interfaces
net:
port: 27017
bindIp: 127.0.0.1,mongodb-node-01# replica set
replication:
replSetName: replicasetMain
mongodb-node-02
# network interfaces
net:
port: 27017
bindIp: 127.0.0.1,mongodb-node-02# replica set
replication:
replSetName: replicasetMain
mongodb-node-03
# network interfaces
net:
port: 27017
bindIp: 127.0.0.1,mongodb-node-03# replica set
replication:
replSetName: replicasetMain
After the updates are completed, restart the mongod service in each instance to reload the configurations.
sudo systemctl restart mongod
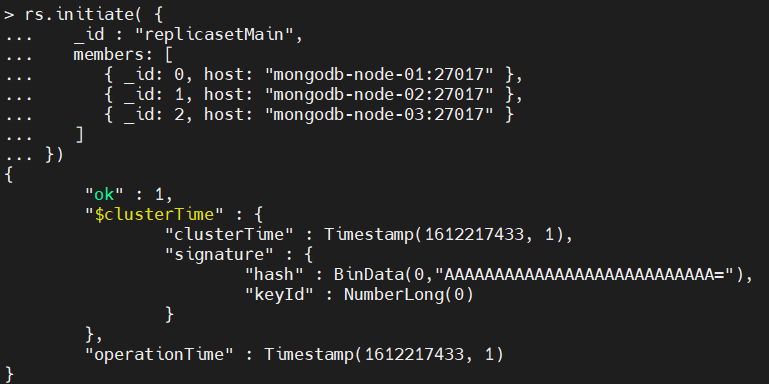
You can initialize a replica set using the rs.initiate() method. This method is only required to be executed on a single MongoDB instance in the replica set. Within the initiate method, you can specify the replica set name and member. These details must match with the configurations you made in each config file in the previous step.
rs.initiate( {
_id : "replicasetMain",
members:
})
Result:
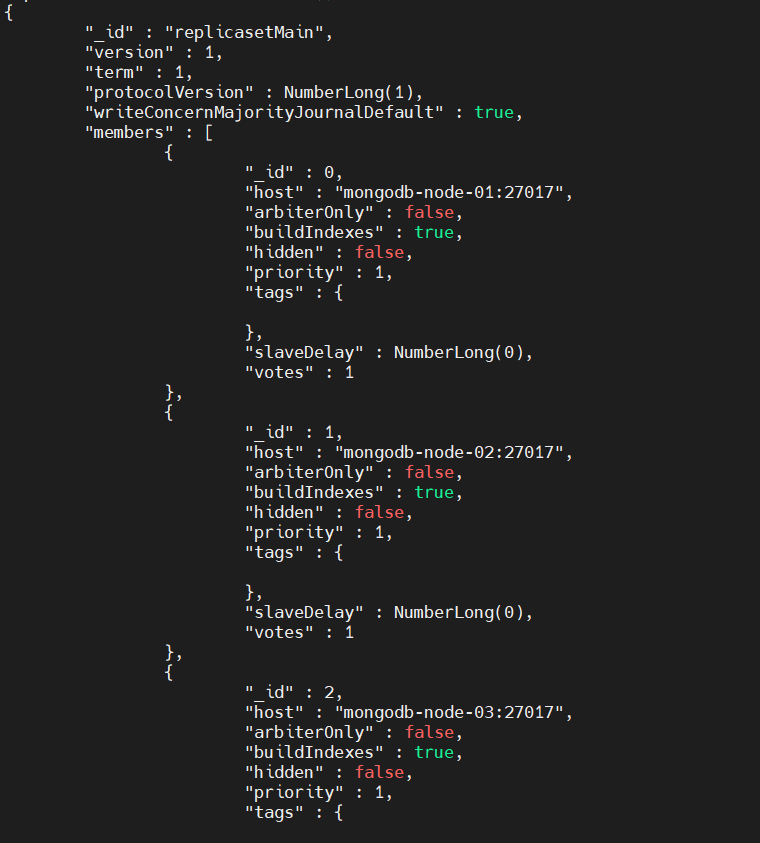
 Using the rs.conf() command, you can view the replica set configuration as shown below.
rs.conf()
Result:
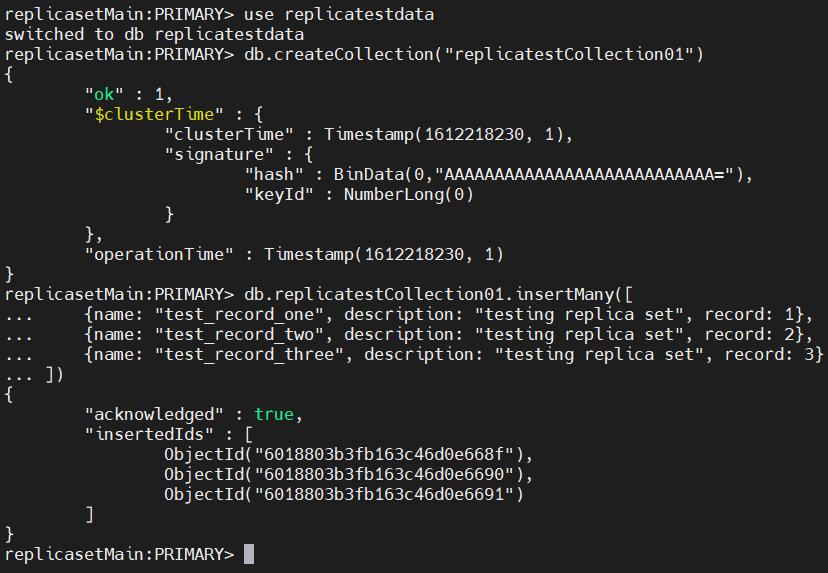
Now that you’ve configured the replication set, the next step is to validate the replication process. To do that, first login to the primary MongoDB node in the replica set.
Then you need to create a collection with some sample data using the following commands:
use replicatestdata
db.createCollection("replicatestCollection01")
db.replicatestCollection01.insertMany()
Result:
 Next, log in to a secondary node and check if the data is replicated. An important thing to note here is that, by default, read queries are disabled in secondary nodes. So, you need to enable them using the following command.
db.getMongo().setSecondaryOk()
After that, you can search for the data and verify if they are replicated well to the secondary node.
show dbs
use replicatestdata
show collections
db.replicatestCollection01.find().sort({record: 1}).pretty()
Result:
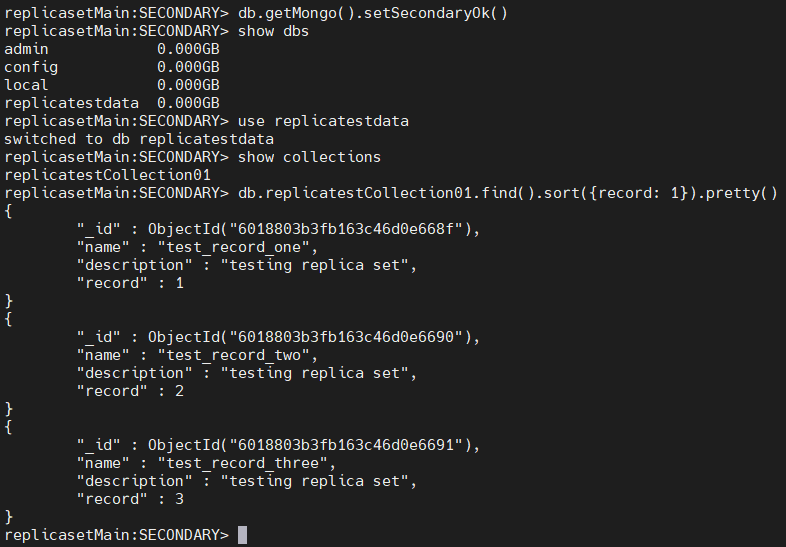 The above result indicates that the data of the primary node was successfully replicated to the secondary instances.
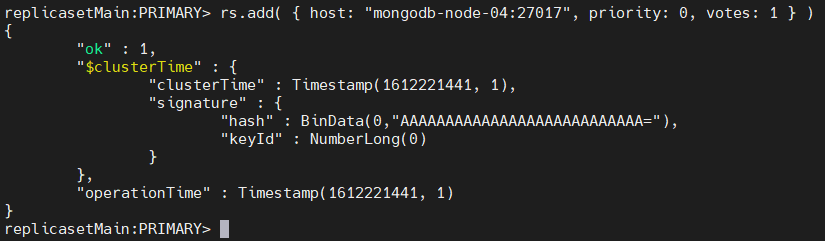
Using the rs.add() command, you can add a new node to an existing replica set.
Before adding a new node, you need to configure it. For that, modify the mongd.conf file to indicate the replica set and restart the mongod service.
mongodb-node-04
# network interfaces
net:
port: 27017
bindIp: 127.0.0.1, mongodb-node-04# replica set
replication:
replSetName: replicasetMain
Then, go to the primary node of the replica set and run the add() command with the parameters listed below.
rs.add( { host: "mongodb-node-04:27017", priority: 0, votes: 1 } )
Result:
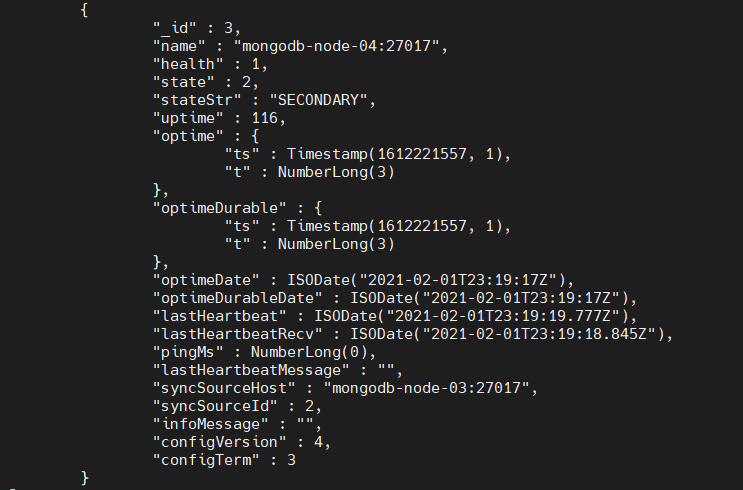
 The above command will add a new node to the replica set. You can verify if the new node has been added by using the rs.status() command, which will display the details of the new node.
rs.status()
Result:
 Finally, the data in the other nodes will be automatically replicated to the new node.
The rs.remove() command can be used to remove a node from the replica set. You need to shut down the server instance before attempting to remove a node. When removing, you can specify which node should be removed using the name of that node.
rs.remove("mongodb-node-04:27017")
Result:
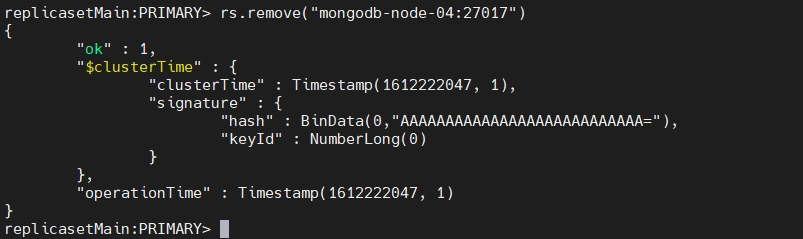 This result indicates that the node was successfully removed from the replica set.