Kubernetes Deployments Fully Explained

Kubernetes Deployment is the process of providing declarative updates to Pods and ReplicaSets. It allows users to declare the desired state in the manifest (YAML) file, and the controller will change the current state to the declared state.
So, let’s look at how to create and use Kubernetes deployments. I’ll walk you through how to utilize Kubernetes deployments to simplify the deployment process and manage, scale, and roll back deployments.
For the purpose of this article, we will be using a locally deployed Kubernetes cluster in a Windows environment utilizing the Windows Subsystem for Linux (WSL).
(This article is part of our Kubernetes Guide. Use the right-hand menu to navigate.)
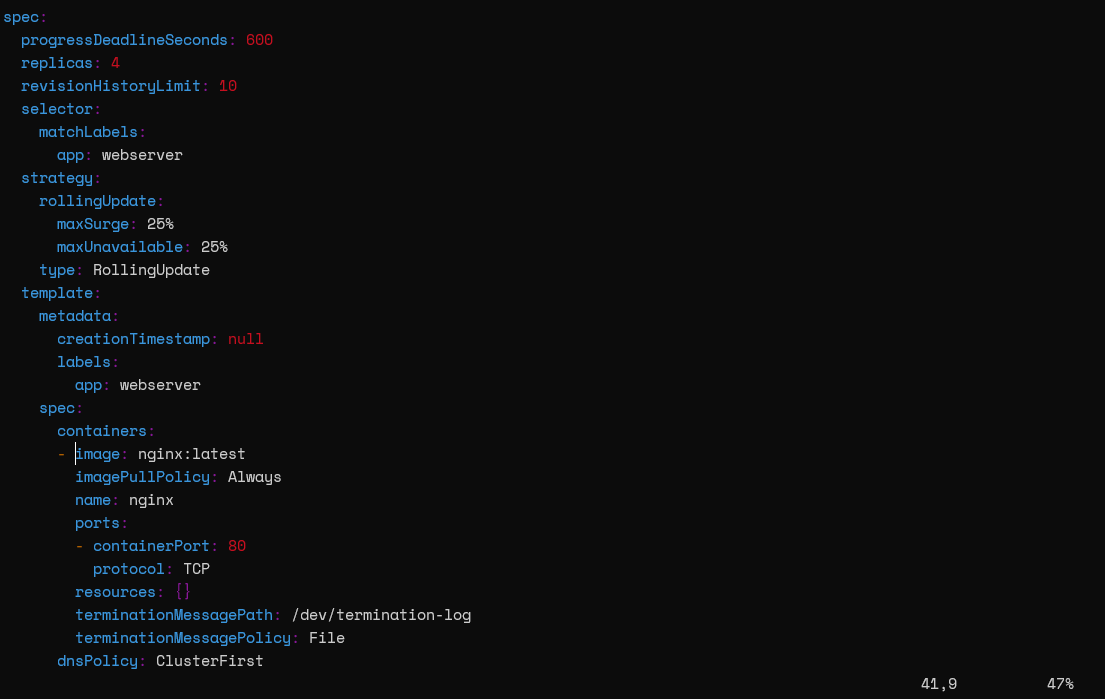
Let’s first create a simple Nginx deployment with four replicas. Like any other Kubernetes configuration, a deployment file will contain:
nginx-deployment.yaml
apiVersion: apps/v1
kind: Deployment
metadata:
  # Define the Deployment Name
  name: nginx-deployment
  labels:
    app: webserver
spec:
  # Define the Number of Pods
  replicas: 4
  # Define the Selector
  selector:
    matchLabels:
      app: webserver
  template:
    metadata:
      labels:
        app: webserver
    spec:
      containers: # Container Details
      - name: nginx
        image: nginx:latest # Image
        ports:
        - containerPort: 80
We can create the deployment using the following command. We have added the --record flag to save the command.
kubectl apply -f nginx-deployment.yaml --record
Result:
![]()
We have defined the following entries in the metadata and specs sections of the above deployment file.
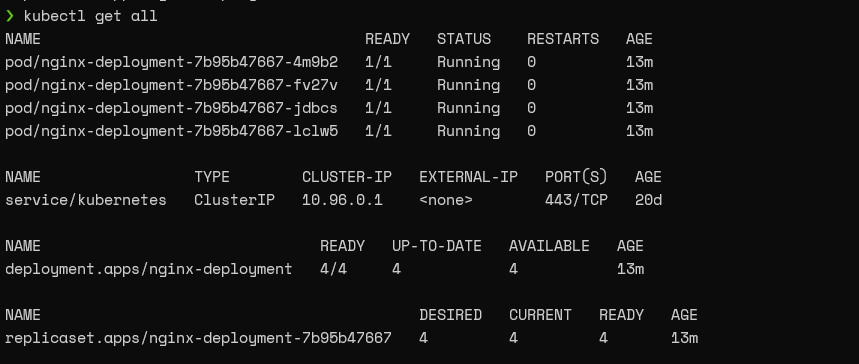
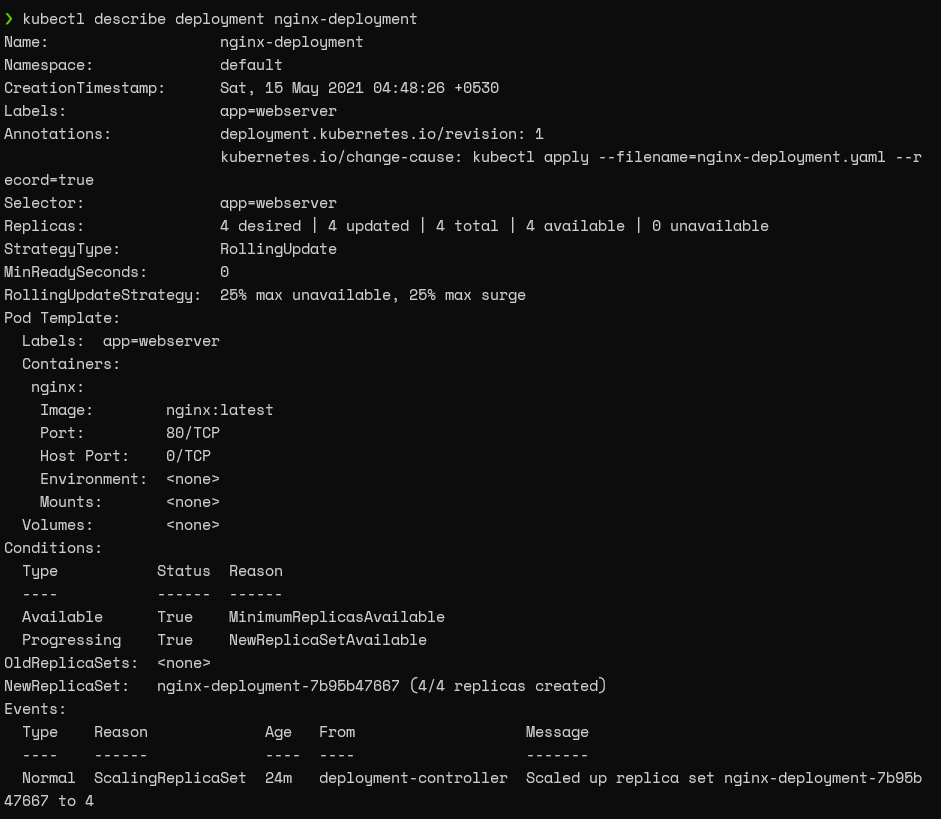
If we check the Kubernetes cluster after some time, we can see that the Pods are deployed with the given template. Additionally, we can retrieve details of the deployment using the describe command.
kubectl get all
Result:
kubectl describe deployment nginx-deployment
Result:
Now we have created a deployment and need to verify if the Nginx web servers were deployed correctly.
The straightforward way to achieve this is to create a service object that exposes the deployment. An important fact to note here is that the way we expose the deployment and the parameters can vary depending on the configurations of the Kubernetes cluster.
kubectl expose deployment nginx-deployment --type=LoadBalancer --name=nginx-web-server
Result:
![]()
kubectl get services
Result:

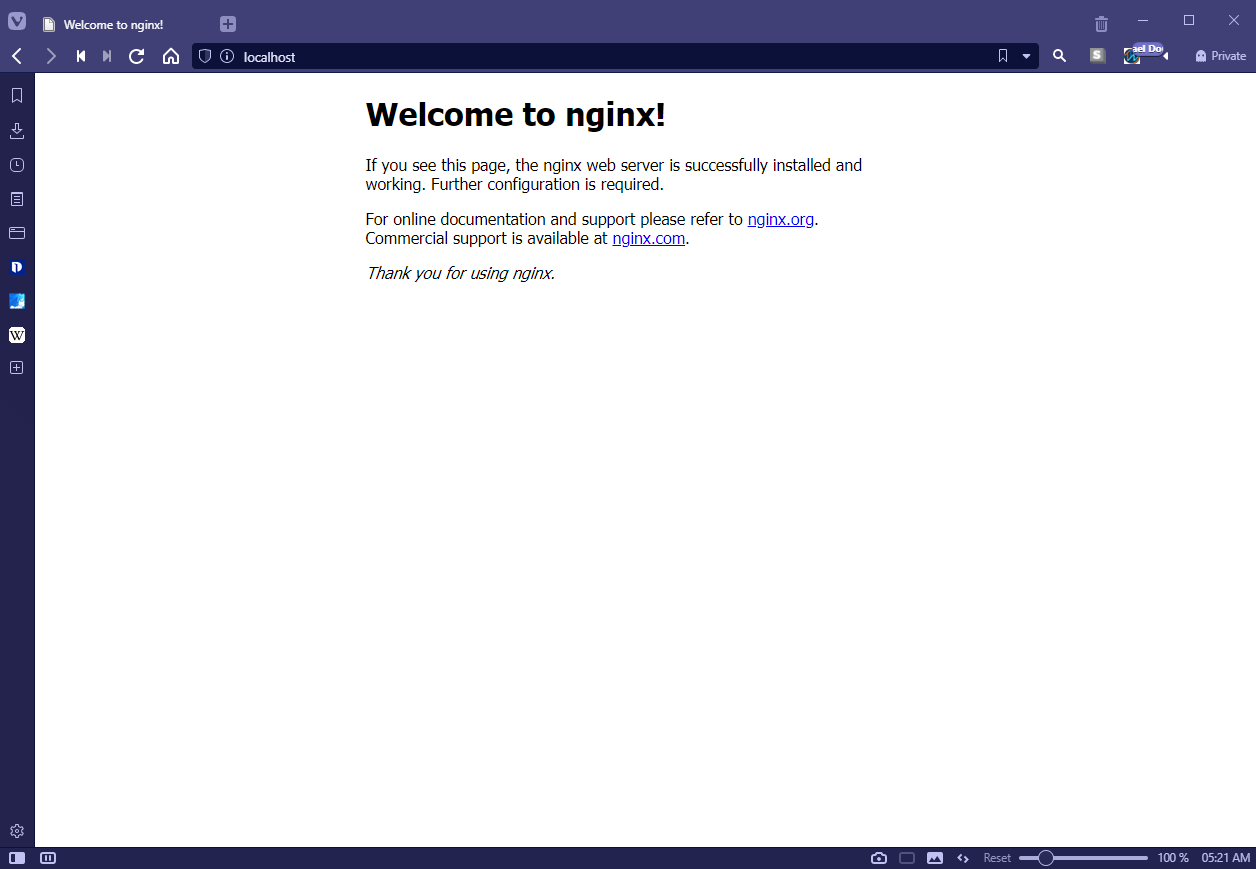
Then we can navigate to the localhost port 80 to check if we can see the default Nginx server landing page as below.
When managing a Kubernetes cluster, the initial step would be to check for a successful deployment. For this purpose, we can use the kubectl rollout status and kubectl get deployment commands.
kubectl rollout status deployment nginx-deployment
kubectl get deployment nginx-deployment
Result:

We can fetch information about the ReplicaSets created during deployment using the kubectl get ReplicaSet command.
By default, Kubernetes will automatically append a pod-template-hash value to the ReplicaSet name. However, do not rename the ReplicaSet as it will break the deployment.
kubectl get replicaset
Result:

The kubectl get pod command can be used to get only the information about the pods related to the deployment while defining a selector. In this instance, we will be using the “app:webserver” label as the selector.
kubectl get pod --selector=app=webserver
Result:

Now we know how to create a deployment and retrieve information about the said deployment. The next stage is to manage the deployment. What differentiates deployments from a simple ReplicaSet is that deployments enable users to update the pods (pod templates) without causing any interruption to the underlying application.
Let’s assume that we need to change the Nginx server version in our deployment to target our application to a specific server version. We can do this by either:
The set image command can be used with the container name of the template and the required image name to update the pods.
kubectl set image deployment nginx-deployment nginx=nginx:1.19.10
Result:
![]()
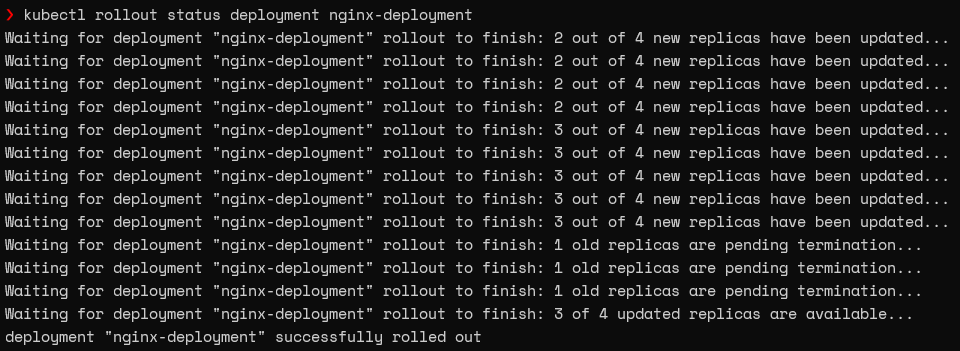
We will get the rollout process if we run the get rollout status command immediately.
kubectl rollout status deployment nginx-deployment
Result:
We can use the edit deployment command to edit the configuration file. Navigate the relevant section (container image) and make necessary changes. Kubernetes will start the process of updating the pods the moment we save the new configuration.
kubectl edit deployment nginx-deployment
Deployment Edit View (nginx-deployment):
Kubernetes uses two deployment strategies called “Recreate” and “RollingUpdate” to recreate pods. We can define those strategies in .spec.strategy.type field. The RollingUpdate strategy is the default for deployments.
In our deployment, we haven’t explicitly defined a strategy so that Kubernetes will use the default RollingUpdate strategy. We can use the describe command to verify the current strategy for the deployment.
kubectl describe deployment nginx-deployment | grep Strategy
Result:

From the above output, we can discern that the default configurations for the RollingUpdate strategy are 25% for max unavailable and 25% for the max surge values. We are creating four replicas in our configuration. According to the above configuration in the update process, a single pod will get destroyed while a single pod is created (25% of 4 is 1).
We can view the Events in the deployment using the describe command to gain a better understanding of the update process.
kubectl describe deployment nginx-deployment
Result:

If we look at the current ReplicaSet, we can notice that it has four pods whereas the old ReplicaSet does not contain any pods.
kubectl get replicasets
Result:

Kubernetes deployments provide the ability to pause and resume deployments. This enables users to modify and address issues without triggering a new ReplicaSet rollout.
We can use the “rollout pause deploy” command to pause the deployment.
kubectl rollout pause deploy nginx-deployment
Result:

Now, if we update the Nginx image in the paused status, the controller will accept the change, yet it will not trigger the new ReplicaSet rollout. If we look at the rollout status, it will indicate a pending change.
kubectl set image deployment nginx-deployment nginx=nginx:1.20 --record
kubectl rollout status deployment nginx-deployment
Result:

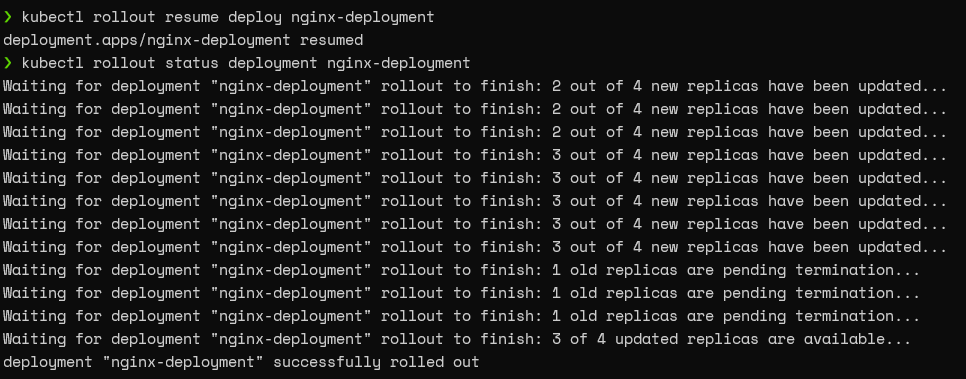
You can simply run the “rollout resume deploy” command to resume the deployment.
kubectl rollout resume deploy nginx-deployment
kubectl rollout status deployment nginx-deployment
Result:
As the Deployments rely on ReplicaSets to manage the pods, we can scale up or down the number of pods. This scaling can be done either:
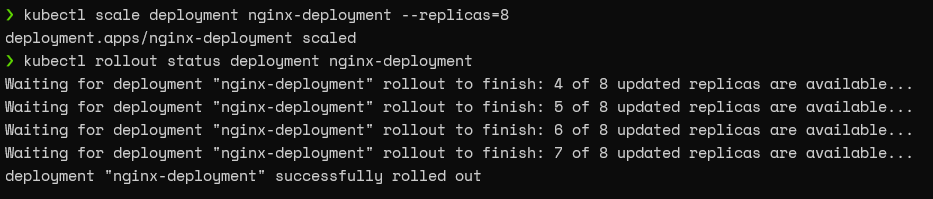
We can use the scale command with the replica parameter to scale the deployment to the desired number. For instance, we will use the following command to scale up our deployment from 4 pods to 8 pods.
kubectl scale deployment nginx-deployment --replicas=8
kubectl rollout status deployment nginx-deployment
Result:
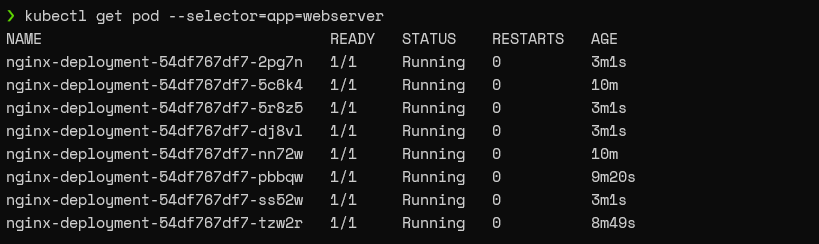
If we look at the pods associated with this deployment, we can see that it has eight pods now.
kubectl get pod --selector=app=webserver
Result:
The best practice for scaling deployments would be to configure an auto-scaling rule so that the pods will scale according to predefined thresholds.
So, let’s go ahead and create an autoscaling rule for our deployment, which will scale according to the CPU load of the node.
kubectl autoscale deployment nginx-deployment --min=5 --max=10 --cpu-percent=70
Result:

According to the above configuration, if the CPU load is greater than 70%, the deployment will scale until the maximum number of pods is reached (maximum ten pods). On the other hand, it will scale back gradually until there are five pods (minimum five pods) when the load is reduced.
Kubernetes also supports rolling back deployments to the previous revision. This is a crucial feature enabling users to undo changes in deployment.
For instance, if a critical production bug was deployed to the cluster, we can simply roll back the deployment to the previous revision easily with no downtime until the bug is fixed.
Let’s assume that we have updated our configuration with an incorrect image. (We will be using the caddy webserver in this example.)
kubectl set image deployment nginx-deployment nginx=caddy:latest --record
Result:

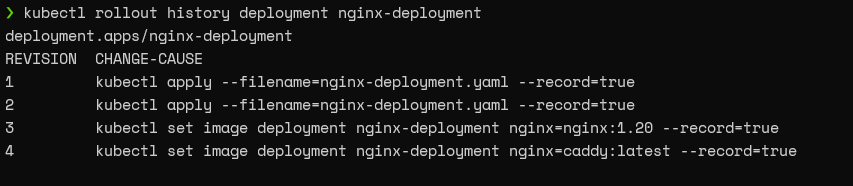
This is where the Deployment controller’s history function comes into play. The controller keeps track of any changes to the pod template and keeps them in history. When we specify the record flag in a command, it will be reflected in the history.
kubectl rollout history deployment nginx-deployment
Result:
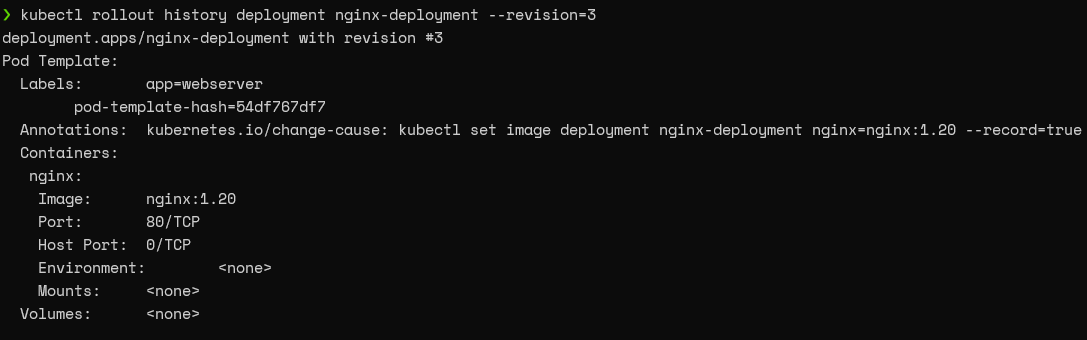
We can use the revision number to inform the deployment controller to roll back our deployment to the previous revision.
First, let’s verify if the revision we are going to roll back is the correct deployment. Here, we are trying to roll back to the third revision. Simply specify the revision in the history command to get the details of the indicated revision.
kubectl rollout history deployment nginx-deployment --revision=3
Result:
After confirming the revision, we can utilize the “kubectl rollout undo” command with the “to-revision” parameter to roll back the deployment.
kubectl rollout undo deployment nginx-deployment --to-revision=3
kubectl rollout status deployment nginx-deployment
Result:
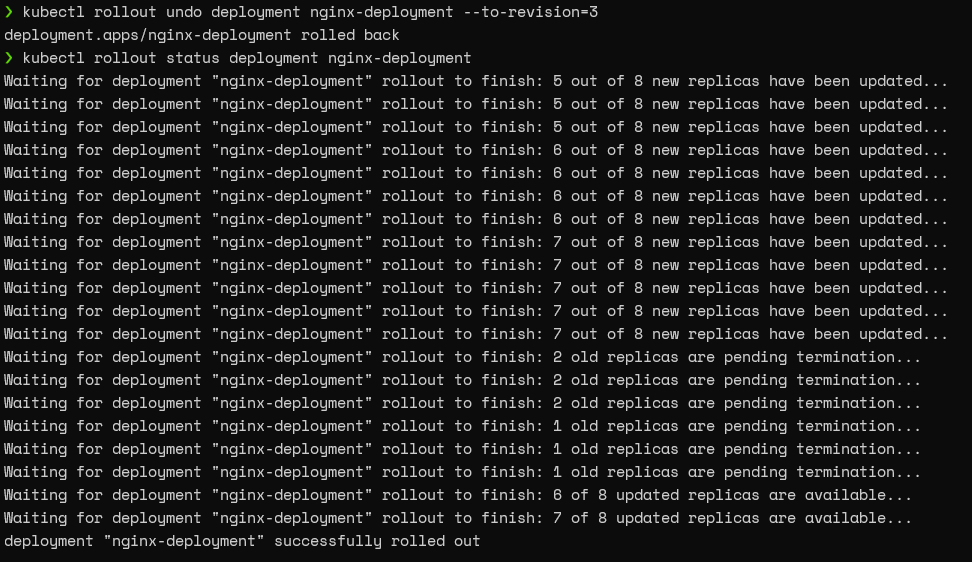
That’s it! Now we have successfully rolled back the deployment.
After the rollback, we won’t be able to see the third revision as we have deployed it as the current configuration. However, we will be able to see a new record with a higher revision number for the newly rolled back deployment.
kubectl rollout history deployment nginx-deployment
Result:

In this article, we have only scratched the surface of the capabilities of Kubernetes deployments. Users can create more robust containerized applications to suit any need by combining deployments with all the other Kubernetes features.